Chapter 4
How to Play
20 Below runs on two dice mechanics. Two. Everything in this book is one of them, or both of them in order, and this chapter is about knowing which one you’re holding.
The first is the Core Roll. It handles almost everything - climbing a wall, picking a lock, talking your way past a guard, and the first half of every attack.
Yes, the first half. I spent a long time trying to make the Core Roll do the whole job, combat included, and every version of it turned into something nobody could hold in their head. Violence needed its own answer.
So there’s a second mechanic. It only comes up when something is trying to hurt you - or you’re trying to hurt something.
Rolling the Dice
The Core Roll
Roll two ten-sided dice and add them together. If the total is equal to or under your Target Number, you succeed at whatever you were trying to do.
Your Target Number is the Element you can justify using plus the Difficulty the GM sets. Difficulty runs from 0 to 10, and this is the part that trips everyone - it runs backwards from what you expect. Zero is nearly impossible. Ten is laughable. A high Difficulty means an easy task.
I know. I can hear the grinding of gears from here.
It works that way because the Difficulty is added to your Attribute. A generous Difficulty gives you a higher Target Number, and a higher Target Number is easier to roll under. After a few rolls it stops feeling backwards and starts feeling like what it is - the GM telling you how much room you have.
Your Target Number can run anywhere from 1 to 20. Two d10s can roll anywhere from 2 to 20, and they cluster hard around 11 - so a target of 1 is an automatic failure, a target of 20 is a sure thing, and everything interesting happens in the middle, where a couple of points either way genuinely changes your odds.
Two results ignore your target number entirely.
Roll a 2 - both dice showing 1 - and it’s a critical success. The best thing that could have happened, and GMs are encouraged to be generous about what that means. What it does in a fight is under Making an Attack.
Roll a 20 - both dice showing 10 - and it’s a catastrophic failure. Whatever you were attempting fails, and something else goes wrong on top of it - the GM decides what, out of whatever you were doing. In a fight it also leaves you Off Balance until the end of your next turn, rolling everything at Disadvantage. A Fate Token clears that, but never the rest of it.
Neither one cares what your target number was. A critical success on a hopeless task still lands. A catastrophic failure on a walk in the park still hurts. Some Skill tiers widen the good end or take some of the sting out of the bad one, which is covered in Skills.
Player: Ronan is going to scale the fire escape.
GM: There’s a ladder that you have to pull down to start it. But the weather is good and it’s not raining, so this is pretty easy. Let’s call it a 7 difficulty.
Player: Cool. Ronan’s Earth is an 8, so that’s a Target Number of 15.
GM: Roll it.
Player: Nine.
GM: Ronan makes it up the fire escape without issue and you are pretty sure no one hear him out there.
Each skill has an Element attached to it. This Element is the default number you will use to perform that skill. That is, unless you argue to use a different element for the roll. That argument is what you use Descriptors for.
Setting the Difficulty
The GM decides the Difficulty of any task. The Difficulty tiers are below
Difficulty
| # | Difficulty | What it looks like |
|---|---|---|
| 0 | Nearly Impossible | Catch an arrow out of the air mid-flight. |
| 1 | Extremely Hard | Pick a masterwork lock with no tools, blindfolded. |
| 2 | Very Hard | Scale a sheer, rain-slicked cliff face. |
| 3 | Hard | Convince a hostile guard captain to stand down. |
| 4 | Challenging | Track a careful quarry through a rainstorm. |
| 5 | Moderate | A tense but ordinary check under pressure. |
| 6 | Fairly Easy | Pick a simple lock with the right tools. |
| 7 | Easy | Climb a sturdy rope with knots tied in it. |
| 8 | Very Easy | Recall a well-known fact in your field. |
| 9 | Nearly Trivial | Walk a straight line on level ground. |
| 10 | Trivial | Tie your own shoes. |
Note to the GM
Don’t agonize over assigning a difficulty. Pick the number that describes what the character is doing and move on. This isn’t about precision - it’s here to give a concrete feel to what is happening so you don’t have to pull a number out of thin air… or your ass. There isn’t going to be a performance review and no one is going to audit it. Go with your gut and move on with the game.
Advantage and Disadvantage
Most of the time, there is a level playing field. However, sometimes the balance of events leans to one sire or another. 20 Below uses a single mechanic for that in all situations - Advantage and Disadvantage.
Where most TTRPG systems simulate advantageous or detrimental circumstances by adding or subtracting from your difficulty or your roll, 20 Below simplifies this with Advantage and Disadvantage. When an event, gift, ally, environmental effect, etc. would benefit you, you roll at Advantage. If anything would impede you, you roll at Disadvantage.
Advantage and Disadvantage are binary. That is to say: You either have it or you don’t - they don’t stack. They also cancel each other out on a one for one basis.
-
EXAMPLE: The group is looking for a ritual to reinforce the wall between dimensions, a task that is solidly within the bounds of the Research skill. Ronan is (shockingly) Adept at Research. This gives him advantage. However, the library where the book is kept is abandoned and without power, a situation that makes researching the information harder. This imposes disadvantage. The advantage and disadvantage in this instance cancel each other out because there is one source of each.
Marcus (Ronan’s player), argues that Ronan knows exactly what he is looking for and can guide the party so they can help him find it. The GM agrees that this is enough to give Ronan advantage, so he rolls at advantage.
To simplify it: if there are multiple sources that would grant Advantage or Disadvantage, treat each instance of Advantage as “+1” and disadvantage as “-1.” Add them up. If the result is 1 or more, roll at Advantage. If it is 0, roll normally. If it is less than 0, roll at Disadvantage.
But what does all of this mean? I am glad you asked. Advantage: When you roll at Advantage, you roll 3d10 and keep the lowest two. Disadvantage: When you roll at Disadvantage, you roll 3d10 and keep the highest two.
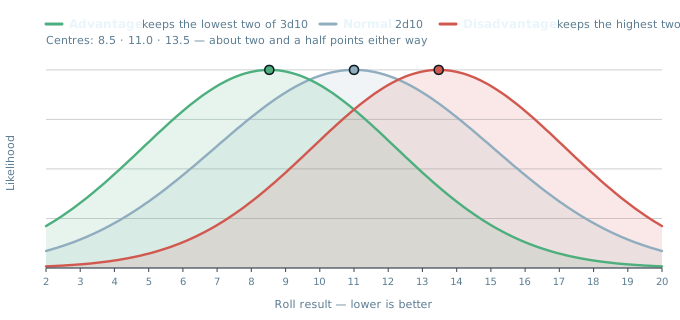
The roll curve, with Advantage and Disadvantage
Yes. Lower is better. Advantage gives you a third chance to get a smaller number. Disadvantage does the opposite.
Off-hand. Doing something that needs manual dexterity or precision with your off-hand - attacking, picking a lock, anything where which hand is doing it actually matters - is at Disadvantage. The Ambidextrous Boon removes that penalty.
Rolling Without the Skill
Sometimes you want to do something that you just aren’t prepared for. In game terms, this means you don’t have a skill that applies in the specific situation. When this happens, you still get to roll - you just don’t get to add your Element to the Target Number.
That’s right - your target number for an Untrained Skill is the Difficulty of the task alone.
You might have noticed that this means you could have a Target Number that is impossible to roll - 0 or 1. Don’t despair. Make the roll anyway. There is always a chance - a critical success will always succeed.
Opposed Rolls
When two characters want opposite things - one sneaking, one watching, one hiding a lie and one looking for it - you both roll, against the same Difficulty, each with your own Element and Skill. If only one of you succeeds, that one wins. If you both succeed, whoever came in further under their target number wins. A tie goes to whoever is resisting, and so does both of you failing: nothing changes.
A creature doesn’t roll its side. Its card gives you the number - Stealth 6 vs. Perception means you roll Perception at Difficulty 6.
Helping
Somebody who is at least Trained in the Skill you’re rolling can help, and that gives you Advantage. A second helper doesn’t give you more of it - Advantage doesn’t stack - but it can cancel out something working against you. If you’re Adept or better you already roll with Advantage, so help only matters when something is making it harder.
Helping means being there when it goes wrong. On a catastrophic failure, whoever was helping is caught in it too.
Trying Again
You don’t get to roll again because you didn’t like the result. A failed roll stands until something changes - a different approach, a better tool, somebody helping, more time. Then it’s a new roll, and a new chance at a catastrophic failure.
Group Rolls
When everyone has to pull it off - sneaking past a guard, crossing a ledge together - everyone rolls. If at least half of you succeed, the group makes it: the ones who are good at it cover for the ones who aren’t. A catastrophic failure spoils it for everyone, however the rest of you rolled.
Taking Your Time
If nothing is coming and nobody is watching, you can trade time for a better chance. Take the next Time Band up - a Minute instead of a Round, an Hour instead of a Minute - and roll with Advantage. If failing wouldn’t cost anything either, you probably don’t need to roll at all. Ask your GM.
Attacks
Making an Attack
The two mechanics in 20 Below meet here. Each attack has 2 steps
Attack Roll
Damage Roll
Make an Attack Roll (To-Hit Roll): An Attack Roll is a Core Roll like any other. The Target number for this roll is your attribute+the target’s Defense.
If you roll at or below this Target Number, your hit lands. If you roll higher than your Target Number, nothing else happens.
A Fistful of Dice: This is where the wall mechanic is used. The number of dice you roll for damage is determined by a few possibilities:
The weapon you are using
The gift you are using
Your Training Tier in the Skill you are using, for a social attack.
Roll those dice. All of them at once. Then compare each one to the appropriate wall (Soak for Physical, Presence for Social, and Psyche for Mental). Any die that rolls higher than the wall, does a level of damage to the appropriate Vital Statistic (Health for Physical, Poise for Social and Sanity for Mental).
Critical Success in Combat. Most TTRPGs handle critical hits by doubling the damage dice rolled or something similar. The effectiveness of the Damage Walls would make doubling the dice pretty ineffective. Instead, when you roll a total of 2 on your To-hit Roll, and you are guaranteed to deal some damage.
When you score a Critical Hit, half of the Damage Dice (rounded up) you would roll are considered to have succeeded. You roll the rest of the remaining dice. Since these dice have been chosen by Fate - add your Klotho score to them. Additionally, you can still use Ki to infuse the dice you roll on a Critical Hit.
NOTE: A Critical Hit can’t kill on its own. No matter how devastating it is, a single attack can only reduce a character to zero health (Unconscious).
Example: Ronan has been verbally sparring with an enemy. Ronan isn’t very smart or witty, so it isn’t going well. He decides to punch him instead. After all, Ronan is the “God Puncher.” Ronan decides to attack his opponent with his Gift, Onslaught. He rolls a 2 - a critical hit. Ronan has Onslaught at level 5 and a Ferocity of 4, so he would normally roll 7 dice for damage.
7 dice, divided by 2 is 3.5. Round it up and you have 4. His opponent takes 4 health levels of damage. Ronan also gets to roll those last 3 dice boosted by his Klotho score. His Klotho is 4. He rolls 2, 1, and 6. His opponent’s soak is 7, so only one of the extra dice does damage.
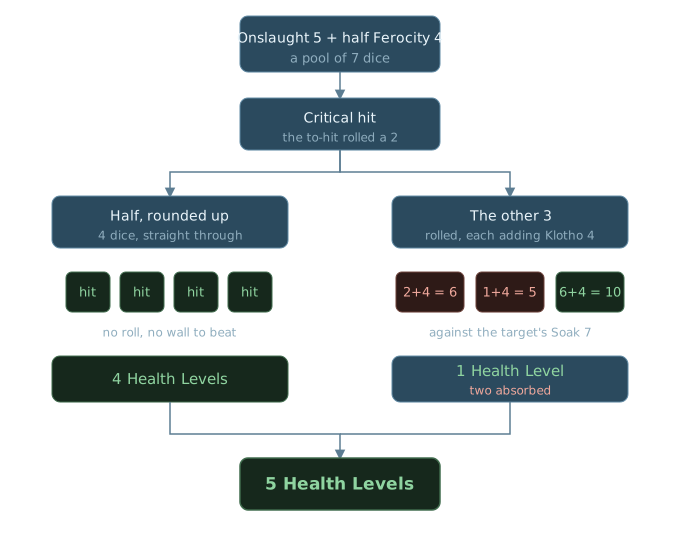
How a critical hit resolves
Which Element Are You Attacking With
Your weapon doesn’t decide. Your approach does.
Earth - Force.I put my whole weight behind it and smash through his guard.
Air - Precision.I wait for him to shift his guard, then thrust through the opening.
Fire - Intensity.I charge him screaming and don’t let up.
Water - Adaptation.I let the swing go past, redirect it, and hit him when he overextends.
Moira - Fate.I say the thing he has been afraid somebody would notice. Social and Mental attacks only.
Same sword in the first four. Describe what you’re doing before you roll, and the GM confirms which Element fits. You don’t get to pick it afterward, once you’ve seen how the numbers landed.
NOTE: Moira never governs a Physical attack. Fate doesn’t swing a bat. It carries a Social or a Mental one readily, because finding the one word that lands is exactly what fate is for.
Defense and How It’s Calculated
Defense is one of the most important numbers to consider in combat. Combat is the one time where the GM isn’t determining the difficulty part of the Target Number equation. When you make an attack, your Target Number is calculated as the Your Element+Target’s Defense.
Physical Defense: Physical Defense=10-your Atropos score. Your Fate decides when it is your time and it’s not your time… yet.
Social Defense: Social Defense=10-your Psyche score. Insight into human behavior helps a character recognize motives, read intentions, and see through social deception.
Mental Defense: Mental Defense=10-your Presence score. A strong sense of self and personal identity provides an anchor against manipulation, intimidation, and psychological intrusion.
The Three Walls
There are three types of damage in 20 Below: Physical, Social, and Mental. When someone lands an attack, the next step is to determine how much (if any) damage gets through. They roll their damage dice for the attack and compare the results of each die to the appropriate wall: Soak vs. Physical attacks, Presence vs Social attacks, and Psyche vs Mental attacks.
All three of these walls are similar to a levee - it stops damage from getting through. Anything that goes over the top deals damage. When an attacker rolls for damage, he throws a fistful of dice. Each die is compared to the wall. If the number on the die is higher than the wall, it deals damage.
A high Soak, Presence or Psyche makes you extremely resilient and difficult to harm. Any of these sub-stats at 10 means that a rolled die effectively can’t harm you sine you can’t roll higher than a 10 on a d10. This means that someone who dumps 10 points into earth and dedicates those 10 sub-stat points into Soak is going to be relatively indestructible. This is intentional. Anime is stuffed with characters like this.
Social Attacks
A social attack goes after somebody’s standing. Ridicule, intimidation, manipulation, public pressure, whatever undermines their ability to deal with the people around them.
A weapon has a Damage Rating. Nothing on your belt tells you how hard you can hit someone with a sentence, so that number has to come from somewhere else. It comes from you.
Your Dice Are Your Training
Whatever Skill you’re using, its Training Tier is how many dice you roll.
Untrained. One die
Trained. Three.
Adept. Four.
Expert. Five.
Master. Six.
Untrained gets one die for the same reason bare fists do. Anyone can say something cruel. Most of it bounces.
That’s the whole calculation. Nobody at the table has to rate how good your line was, and you don’t have to be quick on your feet in real life to play somebody who is. Your sheet already said how good they are at this.
Which Skill, and Which Element
Say what you’re doing and you’ve named the Skill. Name the Skill and you’ve settled the Element too, because every Skill already rolls off a home Element.
Fire. Ridicule, Intimidation, Persuasion, Public Speaking, Performance, Leadership, Deception.
Moira. Insight.
As with any Skill, you can argue for a different Element in the moment if you’ve got a Descriptor that backs it.
After that it runs like a punch. Your Element against their Social Defense to land it, then your dice one at a time against their Presence, rolling high. Every die that gets through costs them a Poise.
Example: A Social Attack
Aiden is Adept at Intimidation, so four dice, rolled off Fire. Vance has Psyche 3, so his Social Defense is 7. Aiden’s Fire is 6, which makes his target number 13, and he rolls a 9. It lands.
Vance has Presence 4, so that is what each die has to beat. Aiden rolls 3, 7, 5 and 9. The 3 is absorbed. The other three get through, and Vance loses 3 Poise.
Mental Attacks
A Gift is the only way you will ever make one. That’s the whole rule, and the rest of this section is what it means.
It is the one place the three attack types stop being symmetrical, and it’s deliberate. Anyone can throw a punch and anyone can throw an insult - a fist and a bad word are both standard human equipment. Reaching into somebody’s head is not, and no amount of nerve or gear substitutes for the thing you either have or don’t.
If your character has a Gift that does it, the Gift says how many dice it throws, and everything after that runs like any other attack: Element against their Mental Defense, then those dice one at a time against their Psyche, and every one that gets through costs them a level of Sanity. Ki boosts a die through by adding your own Psyche. A Signature Move built to resolve against Psyche counts, because a Signature Move is a Gift.
If your character doesn’t have one, Psyche is a wall you have no way to push on. This is a decision and not a gap in the rules.
Plenty of things out there are better equipped than you. A nightmare’s cry doesn’t bother with a to-hit roll and throws more dice than any person could bring to bear. Psyche is the wall you will spend the most time hiding behind and the least time attacking.
Ki
What Ki Is
More than Gifts or Boons, Ki is what sets your character aside from the rest of the world. It is the fuel tank you pull from when the ordinary just isn’t going to cut it. Ki is what takes you from ordinary to extraordinary.
Ki Pool: The thing that defines you - your strongest element - is also what defines your Ki Pool. At the start of play, your Ki Pool is your strongest element+8. This was an intentional design choice. Nothing else about your build effects your Ki Pool. The Nerdy Hacker and the Brick draw from the same font of power and every character in the game starts with a Ki Pool somewhere between 13 and 18.
This is deliberate. Everyone in 20 Below is supposed to have plenty of Ki to draw upon.
Why is Ki so important? Ki is used in the following ways:
Gift usage. Most gifts cost Ki points to use
Gift Check. When gift calls for a Gift Check, you roll 2d10 and your current Ki is your target number. There is no Advantage or Disadvantage on this roll. Yes, with experience points, it is possible to have a Ki over 20. Remember - a roll of 20 is a catastrophic failure and will fail even if your target number is 25.
Preventing Damage. When you would take damage to one of your vitals (Health, Poise, or Sanity) - you can prevent that damage at the cost of 1 Ki per level of damage.
Recovering from Vitals Loss. When your Poise or Sanity is at zero or below, you may spend 1 Ki point to recover from the Humiliated or Shattered state and go back to 1 in that Vital. Ki can’t get you up from Dying - a Fate Token can.
Boosting Damage. After you land an attack with a successful 2d10 roll, you can Boost your Damage Dice. To do so, spend 1 Ki point per boosted die and add Ferocity (Physical), Psyche (Mental), or Presence (Social) to the number rolled on the die.
Bump your Action Bracket. You can spend Ki points to move quicker. You can bump yourself from a Slow Action to a Normal Action for 1 Ki point and from a Normal Action to a Fast Action for 1 Ki point. This means you can take a Slow Action in the Fast Action Band for 2 Ki points.
Recovering Ki: Recover Ki by resting. A Short Rest restores a number of Ki points equal to your Klotho rating, minimum of 1. A Full Night’s Rest recovers all of your Ki. You are playing the big damn heroes of this universe. Ki fuels you. It isn’t a limited resource that you horde.
Spending Ki on the Dice
While anime is rife with characters that are Nigh Indestructible™, it’s also crammed full of characters that can over come it. You’ve seen it - “This isn’t my true power!”
That is why you can boost your damage with Ki. It allows you to roll numbers that are higher than that 10. Roll the damage dice first. With them on the table, you pick which ones to boost, at 1 Ki each. A boosted die adds your matching sub-stat to its own result - Ferocity for Physical, Presence for Social, Psyche for Mental.
This is how damage gets over the levees. A boosted die from a character with a 10 in Ferocity will deal damage 100% of the time, and a 2 in Ferocity has a 20% chance of topping that wall. The second one isn’t good odds, but it is immeasurably better than the 0% chance you had a second ago.
Harm and Recovery
Losing Health, Poise and Sanity
The three health statistics are collectively called the Vital Statistics. Each level you have in Health, Sanity and Poise represent one level of damage. As mentioned above, each Damage Die that makes it over a wall deals knocks out one level of damage. It’s pretty straightforward.
What we haven’t covered is what happens at 0 and below.
At zero and below
| At 0 | Below 0 | At the bottom | Can it kill? | |
|---|---|---|---|---|
| Health | Unconscious | Dying | Dead | Yes |
| Poise | Flustered | Humiliated | Poise resets to 0 and costs a Sanity Level | No |
| Sanity | Overwhelmed | Shattered | A temporary Mental scar effect; Sanity resets to 0 | No |
Each Level you have gives you one negative Level on the same track. If you have 8 Health Levels, you can take 8 levels of damage below zero.
Health
- At 0, you are unconscious. You can take more damage after you are rendered unconscious.
- Below 0, you are Dying. These levels of damage represent real, devastating, life-threatening injuries, but they don’t get worse while you lie there. Only more damage moves you closer to death.
- Reach the bottom of your negative Levels, and you are dead. Seven Health Levels means dead at −7.
Poise
- At 0, you are Flustered. Every Social roll, and anything else that needs you steady, is at Disadvantage until the Scene ends. You can take more damage after you are Flustered.
- Below 0, you are Humiliated. These levels represent your standing coming apart in front of the people whose opinion you needed, and it does not quietly repair itself. You cannot take the lead, negotiate, or speak for the group, and you defer until your Poise climbs back to 0.
- Hit the bottom and your Poise resets to 0 and it costs you a Sanity Level. This level of Sanity damage can’t be soaked, but can be prevented by spending a point of Ki.
- Poise damage cannot kill you.
Sanity
- At 0, you are Overwhelmed. You pick up a temporary Mental scar effect for as long as it lasts, and every roll is at Disadvantage, though you are still acting under your own power. You can take more damage after you are Overwhelmed.
- Below 0, you are Shattered. These levels represent your grip on your own mind giving way. You are panicky and babbling and cannot act on your own, so somebody else has to lead you or drag you. Going below 0 leaves a Mental scar no matter how you recover afterward.
- Hit the bottom and you pick up a temporary Mental scar effect and your Sanity resets to 0.
- Sanity damage cannot kill you either.
Going down, and staying down
One attack can never carry you past 0. However many dice connect, you land exactly at zero. A bear that rolls ten dice at someone with three Levels left doesn’t tear them apart. It drops them.
Once you’re at 0, any further attack takes one Level. Total. Not one per die - one. A body on the ground absorbs a grizzly’s entire turn for a single box. That is why people who go down usually get back up: finishing an unconscious character takes something standing over them, working at it, round after round, while everyone else is still swinging.
So dying here is a thing somebody decides to do to you. Something has to want you dead and be given the time to manage it.
Getting back up. Two things end Dying. Spend a Fate Token and you’re back at 1 Health Level, conscious and able to act - and you can spend it while you’re out cold, because fate doesn’t need you awake. Or somebody stabilizes you - First Aid, a trauma kit, a Gift that says so - and you’re at 0: not Dying any more, still unconscious, and healing at the normal rates from there.
Named and unnamed. All of this is for player characters and the NPCs your GM has given a name. An unnamed NPC who hits 0 is out of the fight and out of the story, and whether that’s dead or down is the GM’s call.
Recovery
Recovery takes time. The rules outline three different time frames for recovery.
- Short Rest: an hour of genuine downtime, and you only get one of them between full nights.
- Full Night’s Rest: a full, largely uninterrupted night’s sleep.
- A Month: the time it takes for Wealth to recover from failed wealth rolls.
Above zero
Short Rest. You heal Health Levels equal to half your Health, rounded up, minimum 1. Poise comes back at half your Presence and Sanity at half your Psyche, both rounded up, minimum 1. Ki comes back equal to your Klotho, minimum 1. One level of Exhausted lifts, unless you are still standing in whatever caused it.
Full Night’s Rest. Health, Poise and Sanity all go back to full, and Ki refills completely. Every level of Exhausted clears, with the same exception: a level you took from the cold does not clear while you are still in the cold. Fate Tokens are not part of any of this. You gain one at sunrise whether you slept or not.
Below zero
Short Rest. An hour does not put a body back together. Below 0 Health Levels a Short Rest gives you nothing at all, and you stay Dying until you get a real night. Poise and Sanity work differently, because a reputation and a mind can turn a corner faster than a wound can close. A Short Rest brings either of them back to 1, not to full, and the normal rates start again from there on the next rest. A point of Ki does the same for either one immediately, without waiting for a rest at all.
Full Night’s Rest. A full night gets you one Health Level, and only one, however tough you are. At −6 that is six nights before you are back to 0, and only then do the normal rates start again - unless somebody stabilizes you, which puts you at 0 straight away. Poise and Sanity come back to 1, the same as they would on a Short Rest. Nothing down here speeds up with a better night’s sleep. Climbing out is meant to cost you time you would rather have spent on something else.
Scars
Going to 0 leaves a mark. Going below it leaves something that lasts.
At 0, whichever Vital it was leaves a mark that’s only for show: a scar, a limp or a changed voice from Health; a nervous habit or a reputation quirk from Poise; a tic, an intrusive thought or a private ritual from Sanity. The Healing and Regeneration Gifts stop the Health one from happening at all.
Below 0, you take a scar: one narrow, lasting effect from the lists below. Health leaves a Physical scar, Poise a Social one, Sanity a Mental one. Your GM picks it, or the two of you talk it over and decide.
- One scar per crossing. Go below 0, heal back up, go below again, and that’s a second scar. Going deeper in one fall doesn’t add another, and you can’t take the same one twice.
- A scar isn’t a Flaw. It gives you no points, and a scar getting in your way never earns you a Fate Token.
- It’s permanent until something heals it.
Healing a scar always counts how far below 0 you went: −1 is one, −7 is seven.
| Scar | By Gift | By Adder | By Skill |
|---|---|---|---|
| Physical | Healing or Regeneration: that many Days | - | Medicine: that many Months |
| Mental | Restoration: that many Days | Talking Down or Taking the Edge Off: that many Weeks | Psychology: that many Months |
| Social | - | - | Networking: that many Months |
A Skill takes regular work across that time from someone Trained in it - and for Networking, that someone is you. A scarred reputation can’t be treated or healed - it has to be rebuilt.
Physical scars
| Scar | Effect |
|---|---|
| Bad Knee | Movement Rate −1m. Disadvantage on Athletics to jump. |
| Stiff Shoulder | Disadvantage on Thrown Weapons and Archery. |
| Shaky Hand | Disadvantage on Sleight of Hand, and on Firearms past Close. |
| Ribs That Set Wrong | Your Stamina baseline for holding breath and running flat-out is halved. |
| Ringing Ear | Disadvantage on Perception by sound. |
| Clouded Eye | Disadvantage on Perception by sight past Close. |
| Weak Grip | Disadvantage on Potence contests to hold on: grapples, climbing, a hand on a ledge. |
| Missing Fingers | Disadvantage on Crafting, Electronics and Security by hand. |
| Limp | Disadvantage on Acrobatics, and in chases on foot. |
| Scarred Lungs | Disadvantage on endurance checks in smoke, cold or thin air. |
| Weather in the Joints | In cold or rain, Disadvantage on Athletics and Acrobatics. |
| Tender Spot | Ki can’t preserve the first Health Level you lose in a Scene. |
| Disfigured | Disadvantage on Disguise. People who’ve seen you once remember you. |
| Bad Back | Disadvantage on Athletics to lift, carry or drag. |
| Slow to Clot | First Aid and Medicine on you are at Disadvantage. |
| Night Blind | Disadvantage on Perception and Driving in the dark. |
| Chronic Pain | Your baseline for any sustained exertion is one unit shorter. |
| Burn Scars | Soak counts 1 lower against fire and heat. |
| Old Break | A hit that costs 2 or more Health Levels also leaves you Off Balance. |
| Wheeze | Disadvantage on Stealth when you’ve moved this round. |
Social scars
| Scar | Effect |
|---|---|
| The Story Goes Around | Disadvantage on Intimidation against anyone who’s heard what happened. |
| Known Face | Disadvantage on Disguise and Stealth where it happened. |
| Stammer | Disadvantage on Public Speaking and Performance in front of an audience. |
| Sore Spot | A Social attack that brings it up gets 1 extra die. |
| Burned Bridge | Disadvantage on Networking with one Contact or faction who saw it. |
| Eyes Down | Disadvantage on Leadership when the person who did it is present. |
| Tell | Insight to read you is at Advantage. |
| Gives Ground | Disadvantage on Barter and Bribery. |
| Rattled | Losing a Poise Level leaves you Distracted. |
| The Nickname | Ridicule that uses it is at Advantage against you. |
| Out of Place | Disadvantage on Etiquette at anything formal. |
| It’s on Video | Once a session the GM can say someone in the Scene has seen it. Disadvantage on Persuasion with them. |
| Can’t Let It Go | When it’s thrown at you in public, Disadvantage on everything else until you answer it. |
| Nervous Laugh | Disadvantage on Charm and Seduction when it matters. |
| Quiet Voice | Disadvantage on Intimidation. |
| Flushes | Disadvantage on Deception about yourself. |
| Won’t Ask | You can’t be Helped on Social rolls. |
| On the Record | Disadvantage on Bureaucracy and Law wherever the record exists. |
| Stage Freeze | Your first Social roll in front of a crowd each Scene is at Disadvantage. |
| Touchy Subject | Ki can’t preserve Poise against a Social attack that brings it up. |
Mental scars
| Scar | Effect |
|---|---|
| The Trigger | One sound, smell or sight leaves you Distracted when it turns up. |
| Night Terrors | A Full Night’s Rest refills Ki only as a Short Rest does, unless somebody keeps watch with you. |
| Hypervigilant | You can’t be Surprised, and you can’t take a Short Rest anywhere unsecured. |
| Phobia | Disadvantage on every roll while the thing is within Close. |
| Lost Time | A stretch of memory is gone. The GM knows what’s in it. |
| Intrusive Memory | A catastrophic failure also leaves you Distracted. |
| Checks the Exits | Your first action in each Scene is at Slow. |
| Flat | Disadvantage on Performance and Charm. |
| Paranoid | You can’t be Helped by anyone you haven’t known a Month. |
| Startle | A sudden loud noise costs you Fast for the round. |
| Drifts | Once a session the GM can say you drift. Disadvantage on Perception for that Scene. |
| Insomnia | Miss a Full Night’s Rest and you wake Exhausted. |
| The Voice | You answer it under your breath. Disadvantage on Stealth. |
| Survivor’s Guilt | While an ally is Dying, you can’t spend a Fate Token on yourself. |
| Freezes | Surprised lasts a round longer. |
| Tunnel Vision | Under Mental attack, you can’t Help or be Helped. |
| It Knows You | Mental attacks from the thing that did it get 1 extra die. |
| The Dark | Disadvantage on every roll in darkness without a light. |
| Fixated | While it’s in the Scene, Disadvantage on anything that isn’t about it. |
| Cracks | Disadvantage on Academics, Research and Law in combat. |
None of these fit? Your GM can make one. It should come from the moment you were hurt, bite about once a session, and never touch every roll you make.
Time
How Time Works
Time is divided into discrete segments. In order of length, they are a Round, Minute, Hour, Scene, Day, Week, Month, Year, Decade and Century.
Round. About six seconds, and the base unit everything else is measured against: one pass through the turn order, long enough for everyone present to do one thing.
Minute. Ten Rounds, which is exactly sixty seconds and also the span of a fight that goes badly rather than quickly.
Scene. However long the thing you are currently doing takes, from the moment it starts mattering to the moment it stops, and the GM calls the edges.
Day. A full cycle including a night’s sleep, which is the shortest band that lets you recover properly and the longest one you can plan inside.
Week. Seven Days, and the span for anything that takes regular work to fix: a habit, a debt, a mind being talked back from somewhere.
Month. Long enough for wounds to close, for people to hear things, and for a reputation to settle into whatever shape it is going to keep.
Year. The length of time for things that change a character rather than a situation: training that takes, debts that come due, the world moving on without asking you.
Combat
Combat is both mechanics with a turn order bolted on. Nothing in this section replaces anything you’ve already read.
If you skipped straight here because you wanted to hit something, go back and read the two mechanics first. I’ll wait.
Combat Order
Roll Initiative once, at the start of the fight: 1d10 plus your Initiative sub-stat, highest first. You do not re-roll it every round. That order holds for the whole fight.
Then, each round, everyone declares an Action Bracket - Fast, Normal, or Slow.
Then it resolves band by band. Everyone in Fast goes, then everyone in Normal, then everyone in Slow. Inside a band, your Initiative order decides who goes first.
Action Brackets
Fast gets one action. You go first, and that’s all you do - a move, an attack, one Skill use.
Normal gets two actions. The balanced middle. A move and an attack, usually.
Slow gets one empowered action. You go last, but the action is stronger - you Aim for Advantage, line up a Called Shot, study your target - and you can still take a single step, one meter, before or after it.
Fast trades what you can do for when you do it. Slow trades the other direction - you go last, but the one thing you do, you do properly. Normal doesn’t trade anything away, which is why most people spend most of their rounds there.
You can spend 1 Ki per step to bump the band you declared - Slow to Normal, or Normal to Fast. Two Ki moves two steps. A bumped action keeps everything it was: a Called Shot bumped to Fast is still a Called Shot.
What an Action Buys You
Beyond attacking or moving, these are what you can spend an action on. Anything a Gift or a weapon says about its own action cost overrides this list.
Empowered actions
Empowered actions are what a Slow round buys. You get one of them, plus your one-meter step.
Aim
Advantage on the attack.
Called Shot
You hit something specific: a hand, a strap, the weapon they’re pointing at you. No Advantage.
Study a Target
No roll; the round is the price. Next round, your first attack on it has Advantage, and that includes a Called Shot.
Careful Work
Advantage on a Skill roll made with your whole attention, and it holds round after round on the same job until something interrupts you.
Brace
Until your next turn, nothing can Bulldoze you, shove you or knock you down.
Bulldoze
Charge at least five meters, and no more than twice your Movement Rate, to drive something out of its space. Roll your Potence in dice against its Soak; each one over shoves it back a meter, and you step in behind it. If nothing gets through, you stop beside it.
You can’t Aim and take a Called Shot in the same round. You can take two rounds over it: Study a Target, then take the shot with Advantage.
Special actions
Special actions belong to one band.
Attack on the RunFast only
A full move and an attack, with a gun or a blade, anywhere along the way. The attack is at Disadvantage.
Snap to CoverFast only
A single step into cover beside you, still on your feet.
Dive for CoverFast or Normal
Fast, you move up to your Movement Rate before anyone slower acts, and land Belly Down. Normal, you make a full move first and then dive.
SprintSlow only
Five times your Movement Rate, and nothing else.
Everything else
DashNormal
Both actions on movement. Up to twice your Movement Rate, nothing else.
Reckless
free, just declared. Advantage on your attacks this round, and Advantage on everyone’s attacks against you. It is exactly as stupid as it sounds, and every so often it is exactly the right call.
Full DefenseNormal
You can’t attack. Your other action can still move you. Attacks against you are at Disadvantage and your Defense drops by 4, floored at 0.
Grab
from Melee, an attack, then your Potence in dice against its Soak. Any one over and it’s Grabbed.
Disarm
a Called Shot at what they’re holding, then Potence against Potence to knock it loose.
Help
your action goes into someone else’s, and their next roll has Advantage.
Ready
name a trigger and hold your action for it: when it comes through the door.
Draw, swap, stow, use
getting a weapon out, putting one away, or using a simple item takes an action.
Reload
depends on the weapon. Magazines, speed-loaders and crossbow cranks take one action. A tube-fed shotgun, loaded shell by shell, takes a full Slow action. A bow pulled from a quiver is free. Each weapon lists its own cost.
Movement
Map or No Map
20 Below plays with a map or without one, and the rules are the same either way. Only how you keep track of where everyone stands changes. A table can switch in the same session: a map for the fight in the warehouse, no map for the chase across the rooftops after it.
Theater of the mind has no map. The GM describes the scene, you say what you do, and the picture lives in everyone’s head. It still runs on your sheet. The GM keeps rough distances in meters - the dog is about thirty meters off, across the car park - and when you need to know whether you can reach something, you ask how far it is. Close enough is fine. Nobody measures.
Tactical play puts the scene on a map. One hex is one meter, so your Movement Rate is simply the number of hexes you can move. Print a map at an inch to the meter and the tokens stay true to scale.
Either way, distance falls into four bands, and the band follows from where you end up.
Melee is contact, out to about one meter - arm’s reach. On a map, the next hex. Close is one to ten meters: the same room, across a bar, the width of an alley. Near is ten to fifty - across a street, the length of a corridor, the far side of a car park. Far is anything past fifty meters, rooftop to rooftop.
Moving in a Round
Your Movement Rate is 5 plus your Air, in meters. One move takes you that far. Which band you declare decides how many moves you get.
Fast: one action. Move your Movement Rate, or do something else and don’t move. Normal: a move and one other action. Or two moves - a Dash, twice your Movement Rate. Or two other actions and no move at all. Slow: one empowered action and a one-meter step. Or a Sprint: five times your Movement Rate, and nothing else.
In a Normal round you can split your move around the other action: move, then shoot; shoot, then move; or move, shoot, and move again, as long as the total stays inside your Movement Rate. A Dash and a Sprint don’t split. They’re all movement.
A Sprint goes last, because Slow does - unless you pay for it. Bump it with Ki like any Slow action: one Ki and it runs in the Normal band, two and it runs in Fast. It’s still a Sprint. It just happens sooner.
Leaving Melee
You can always just move away. Nobody gets a free swing at you as you go, and there’s no roll to break off. What it costs you is time. Whatever you were fighting hasn’t gone anywhere, and if it hasn’t acted yet this round, it can follow you and attack - as long as its move reaches you.
So getting clear comes down to when you go and how far you get. A Fast move goes before anything in the Normal or Slow bands. A long enough move leaves it short. A Sprint gets you furthest, but it goes last unless you bump it, so the thing you’re running from bites first.
If something has you Grabbed, you’re not going anywhere until you escape the hold.
You can move through a friend’s space but not an enemy’s, and you never stop in a space someone else is standing in - unless you Bulldoze them out of it.
Getting Low and Taking Cover
Belly Down is getting down on purpose, and it costs you nothing. Flat on the ground, you’re a smaller target: ranged attacks against you are at Disadvantage. Up close it’s the other way round - your Melee attacks are at Disadvantage and Melee attacks against you gain Advantage. You can still shoot. Standing back up takes an action.
While you’re Belly Down you can Crawl, at two meters of movement for every one you cover.
Prone is different. Nobody chooses Prone - it’s what happens when a blow, a fall, or bad footing puts you on the ground. Prone, you can’t attack and every attack against you gains Advantage, and you can’t crawl. Getting yourself together takes an action.
Cover comes in two kinds, and the GM tells you which. Behind full cover, anything that needs to see or reach you can’t. Behind partial cover - a corner, a car door, a low wall - attacks against you are at Disadvantage. Belly Down behind partial cover doesn’t stack into anything worse, but it does hold up when a shooter takes the time to Aim.
Bad Ground
Not every meter costs a meter.
Clear ground - a floor, a road, a lawn - costs what it says. Rough ground - mud, deep snow, rubble, undergrowth, knee-deep water - costs two meters of movement for every one. Wild Land - bog, a collapsed building, a thicket, drifts past your waist - costs three.
You can push through it. Once a turn, when your movement takes you onto bad ground, roll Athletics at Difficulty 6. A success crosses Rough as if it were clear, and Wild Land as if it were Rough - never better. A failure pays the full cost. Athletics is Earth by default, but your Descriptors can argue for another Element, the same as any Skill.
Footing is different from ground. Ice, a slick deck, loose scree - walk across it carefully and nothing happens. Dash, Sprint or Bulldoze across it and you roll Athletics at 6, and a failure puts you down Prone.
Tight spaces - a crawlspace, a vent, the gap between two buildings - cost double to squeeze through, and while you’re squeezed you can’t attack, and anything attacking you is at Disadvantage. Crawling ignores Rough ground entirely; you crawl through plowed dirt as easily as grass. Wild Land still costs you its three.
Climbing, Jumping and Swimming
Climbing
Climbing costs two meters for every one you go up. Roll Athletics once a turn at the surface’s Difficulty: a success climbs at your full rate, a failure at double cost, and a roll of 20 means you fall.
How hard the climb is
| Difficulty | Surface |
|---|---|
| 10 | a stepladder, a waist-high wall |
| 9 | a ladder |
| 8 | a tree with low branches, a chain-link fence |
| 7 | a sturdy rope with knots tied in it |
| 6 | a rock face with good holds, a drainpipe |
| 5 | a plain rope, a brick wall with crumbling mortar |
| 4 | a rough stone wall, a rope while carrying someone |
| 3 | an overhang, a crumbling cliff |
| 2 | a sheer, rain-slicked cliff face |
| 1 | smooth concrete, bare ice without tools |
| 0 | vertical glass |
Rain, wind or darkness make any of it a step or two harder. Nearly Impossible isn’t impossible, though. The strongest people in this game can climb glass.
Jumping
A running long jump clears your Air in meters. Standing, it’s half that. A high jump gets half as high as you can jump forward.
Jumping further
| Extra distance | Athletics Difficulty |
|---|---|
| +1 m | 8 |
| +2 m | 6 |
| +3 m | 4 |
| +4 m | 2 |
| +5 m | 0 |
Fall short and you land at your Air distance - and if that’s over the drop, you go down it, unless you land next to an edge. Then you get Athletics at 6 to catch yourself, and climbing out is a climb.
Swimming
Swimming can’t be done untrained. If you don’t have the Swimming Skill and you end up in deep water, the No-air clock starts right away, unless you’ve got hold of something that floats.
If you can swim, you swim at your Movement Rate. Staying up is the hard part. In calm water you get your Stamina in Hours for free; in rough water - a current, waves, or swimming with weight - your Stamina in Minutes. After that, roll Water plus Difficulty once an Hour (or a Minute), starting at 8 in calm water and 6 in rough, one step harder every roll. Each failure is a level of Exhausted, and Exhausted 5 means you go under. Cold water piles its own Exhausted on top, which is how a winter river kills a strong swimmer.
Creatures that move differently
Creatures that fly, swim, climb or burrow do it at the rate on their card, with no extra cost and no roll - unless you changed the ground. Bring the building down, flood the room, throw the caltrops: then it pays like anyone else. When something outclasses you on its own ground, change the ground.
Chases
A chase is ordinary movement, round after round, with a roll for the route. Everyone declares their movement as usual. Then everyone makes a Chase roll at Difficulty 6 - Athletics on foot, Driving in a car, Piloting in the air or on the water - and the GM makes it a step or two harder when the route is bad. Being faster doesn’t earn you a bonus; the meters already count your speed.
One side succeeds and the other fails: the side that failed hits the fruit stand, and moves at half this round. Both succeed, or both fail: everyone moves in full. A critical success: you move half again as far.
At a meter or less, you’re caught. Get out of sight - around the corner the GM just described - and you roll Stealth against your pursuer’s Perception. Win, and you’ve lost them. Lose, and they’re back on your trail. When you’re the ones chasing, you roll Perception or Tracking against the quarry’s Stealth.
Running is exhausting. A Sprint is running flat out: your Stamina in Rounds for free, then a roll of Water plus Difficulty every Round, starting at 6 and getting harder, with a level of Exhausted for each failure. The fast get away, and so do the sneaky. Everyone else needs a plan.
Travel
Over hours and days you stop counting rounds and start counting kilometers. You walk 3 plus a fifth of your Air kilometers an hour on a road or a trail, and your travel day is 4 plus your Stamina in hours. That puts a fragile character at about sixteen kilometers a day and the toughest at forty-five - which, not by accident, is what real people manage. A group goes at its slowest member’s pace and stops when its shortest day runs out.
Rough ground halves the day’s distance and Wild Land cuts it to a third. Nobody rolls for it; a whole day on bad ground isn’t one lucky stride.
Walking past your travel day is a forced march. Every extra Hour, roll Water plus Difficulty, starting at 7 and one step harder each Hour, and take a level of Exhausted for every failure. A night’s sleep clears it.
Nobody gets lost unless the GM says the country, the weather, or the dark makes it a question. Then it’s a Navigation roll - unless you brought a compass and a map.
Conditions and Hazards
Conditions
Eight states you can be put into. Most of them hurt you by taking dice away. Three of them go further.
Off Balance
You rolled a catastrophic failure in combat. You roll everything at Disadvantage until the end of your next turn. It does not stack, it clears on its own, and a Fate Token spent to Shrug Off an Effect clears it early - though it never undoes whatever else went wrong on that roll. The Never Off Balance Boon lets you reroll the failure that caused it: on attack rolls at its first tier, on any roll in combat at its second, and on any roll at all at its third.
Distracted
You lose a Health Level, or get hit by a Kotodama, while resolving a Slow action. Roll Atropos plus Difficulty to hold your concentration. Succeed and the action goes off as declared. Fail and it drops to a Normal action, losing whatever its empowered action gave.
Other things can make you Distracted too - a Gift, a collapsing building, an explosion right next to your head. Same roll. Outside a Slow action, failing means Disadvantage on whatever triggered it instead. The Concentration Boon makes you immune to all of it.
Surprised
You didn’t see it coming, usually because someone’s Stealth beat your Perception. You roll everything at Disadvantage for the rest of that round. It clears when the round ends. The Alertness Boon makes you immune while you’re conscious.
Flustered
Your Poise hit 0. You roll all Social rolls at Disadvantage, and anything else where keeping your composure matters, for the rest of the Scene. You can spend an action on a Presence plus Difficulty roll to pull yourself together early.
Humiliated
Your Poise went below 0, and this is the one that doesn’t just cost you dice. You can’t take the lead, you can’t negotiate, and nobody is going to let you speak for the group - you defer and you comply. Your body works fine. You’ll swing a sword all day. This is social paralysis, not physical. It clears when your Poise climbs back to 0.
Your Poise track runs as far below zero as it does above it - eight Poise means Humiliated all the way down to minus seven. Hit the bottom of it and something gives. Your Poise resets to 0, which puts you back to Flustered rather than back on your feet, and you take a point of Sanity. No roll, no wall - your Psyche does not defend against this, because this is not something being done to your mind. It is your standing in the room finally coming apart, and taking a piece of you with it. A point of Ki still stops it, the same as it stops anything else.
Overwhelmed
Your Sanity hit 0. You pick up a temporary Mental scar effect - your GM picks it, or you agree it together - and you roll everything at Disadvantage. You can still act, and you’re still yourself. It clears when you’re out of whatever did it to you and get a chance to rest, or for 1 Ki, which brings your Sanity back to 1 on the way out.
Shattered
Your Sanity went below 0, and this is the other one that doesn’t just cost you dice. You’re panicky and babbling and you can’t act on your own - somebody has to lead you, or drag you. It clears for 1 Ki or a rest, but either one only brings your Sanity back to 1, not full, and going below 0 leaves a Mental scar however you climb out of it.
Exhausted
The only one that stacks. You take levels of it, one through five, from pushing an effort past what your Stamina covers, or from cold, or from heat.
- 1: Disadvantage on Physical rolls
- 2: Disadvantage on everything
- 3: Your Movement Rate is halved, and you lose Fast actions
- 4: Every Ki spend costs 1 more
- 5: On the ground, unconscious, until somebody gets you warm, cool, or rested
A Short Rest clears one level. A full night clears the lot.
Common Hazards
The world hurts people without anybody swinging anything, and all of it runs on the same machinery: a number of d10, one at a time against your Soak, every die that gets through costing a Health Level. The weapon table is the scale. Fists are 1, a knife is 3, an anti-materiel rifle is 5. A hazard is a number on that same line.
Hazards at a glance
| Hazard | What it does |
|---|---|
| Falling | 1 die per 4 meters, up to 5 dice. Halved into water, deep snow or a hedge |
| Fire | A burning room: 1 die per round you stay. On fire yourself: 2 dice per round until it’s out |
| Vehicle | 1 die per 10 MPH / 16 km/h, no cap |
| No air | Stamina rounds free, then 1 Health Level per round. Soak doesn’t help |
| Cold and heat | Levels of Exhausted, not Health |
| Corruption | A track of its own, 0 to 5 |
Falling
One die per four meters, up to five. Off a kitchen counter isn’t worth rolling. A flight of stairs is about one. Three storeys down a stairwell is three, which is the same as being stabbed. Past twenty meters you are throwing five dice and there is nothing worse to throw. Landing in water, deep snow or a hedge halves it.
Fire
A burning room is one die at the end of every round you are still in it, and it doesn’t stop until you leave. Being on fire yourself is two, and it doesn’t stop until you put it out - a Normal action for you, a Fast one for somebody helping.
Getting hit by a vehicle
One die per 10 MPH, or per 16 km/h. Clipped in a parking lot is 1. A city street is 3. The highway is 7, and it doesn’t stop there - there is no cap. What still holds is the rule that one attack never carries you past 0, so the truck puts you on the ground rather than under it. Anime is full of people who get up from that.
No air
Drowning, smoke, a bag over your head - you have Stamina rounds. After that it is one Health Level per round, and Soak doesn’t help, because there is nothing to soak. It is the one hazard armour is no use against.
Cold and heat
Cold. This is the one the game is named after, and it doesn’t take Health. It takes Exhausted levels, and gear is the whole defence. Dressed for it, nothing happens. Underdressed, a level an hour. Wet, or in a wind, or genuinely twenty below, a level every half hour. In cold water, a level a minute. And you cannot clear cold Exhausted while you are still cold - a Short Rest in a snowdrift is not a rest.
Heat. The same ladder from the other end. Working hard in real heat is a level an hour. With no water it is a level an hour whatever you are doing, and nothing clears until you drink. Enclosed, airless and with no shade, a level every half hour.
Exhaustion from cold and heat
| Conditions | Exhausted |
|---|---|
| Dressed for the cold | Nothing happens |
| Underdressed | 1 level per hour |
| Wet, in a wind, or genuinely twenty below | 1 level per half hour |
| In cold water | 1 level per minute |
| Working hard in real heat | 1 level per hour |
| No water in the heat | 1 level per hour, whatever you are doing; nothing clears until you drink |
| Enclosed, airless, no shade | 1 level per half hour |
Neither one costs you a Health Level. They put you at Exhausted 5, which puts you on the ground, and out there that is the same thing. A blizzard is dangerous to somebody nobody has laid a finger on.
Corruption
Some things get their hooks into you: a presence, an otherworldly thing, a place. It changes you slowly. At first you don’t notice it. Eventually, you don’t mind. It isn’t damage, and it costs no Sanity - it’s a track of its own, zero to five, and you only have one.
There is only one thing doing this. What you meet is one of the places it gets through - a lake, a radio, a thing in a basement - and each of those is a locus. Get caught by the lake and then by the radio, and it’s the same track going up. Whichever locus pushed you up last is yours: that’s the one you want to go back to, and that’s whose mark you carry. Near any of the others you’re Distracted, and you know them for what they are.
Every time you’re exposed - you look at it, touch it, breathe it, sleep near it, whatever that source feeds on - it rolls its dice against your Klotho. If any die gets over, you slide one level. Only one, however many got over. A rare few are worse than that, and your GM will know which. Some loci are creatures, and a creature can put its will behind those dice the way you put Ki behind an attack. Nothing else gets through a Klotho of 10.
Corruption - The five levels
| Level | Name | What it means | How it clears |
|---|---|---|---|
| 1 | Tell | A small sign of your locus, and everyone sees it but you. | A day away and it’s gone. |
| 2 | Pull | You want to go back to your locus. You’re Distracted near it, or when something keeps you from it. | Each day away takes a level off, but the wanting lasts a week for every day you spent at Pull or worse. |
| 3 | Marked | Your locus’s mark, which you may or may not notice, and anyone who touches it risks catching it too. | Only your locus’s cure - something rare, and somebody out there knows what. |
| 4 | Conduit | You read as unnatural, and reality goes thin around you: Kotodama costs less near you, for everyone. | Only destroying or sealing your locus brings you back from here. |
| 5 | Claimed | It has you. If you keep playing, it’s steering you now. | The party’s Kotodama - six Fate Tokens or more. Whether the character leaves play is up to you and your GM. |
Up to Conduit, you can burn a Fate Token per level to claw your way back down, all the way to nothing. Every level you burn counts against the spends you can make in a Scene, because Corruption is meant to be that hard to shake. The pull stays either way.